pwdUnix Basics
The file system
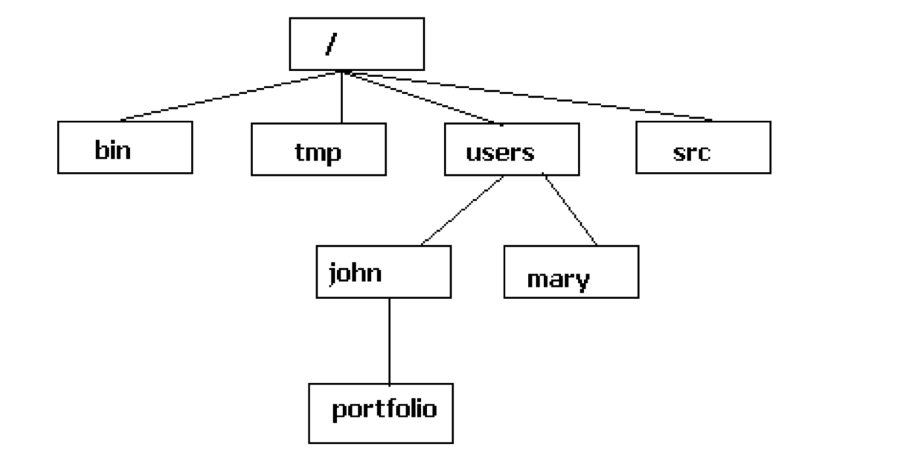
Before getting started with the CLI, lets first understand the file system used by Unix, which might look some thing like this:

The Unix File System is a logical method of organizing and storing large amounts of information in a way that makes it easy to manage. Some key features are:
- Different to what you might be used to from Windows, Unix does not use Drives but appears as a rooted tree of directories
- The first directory in the file system is called the root directory represented by
/
- Different storage devices may contain different branches of the tree, but there is always a single tree. e.g., /users/john/ and / users/mary/
pwd: Finding out where we are
Now that we know how the file system looks like, we do want to move around. Since we do not use a GUI we can not use the mouse to point and click but instead have to write down what we want to do.
pwd prints the location of the current working directory and basically tells you where exactly you are. Usually when we login we start from what is called our home directory. This generally will be something like /Users/username but might be slightly different depending on your operating system.
Now that we know where we are, let’s see how to move around by first seeing what other folders there are. For this we can use the ls command, which stands for list directory contents
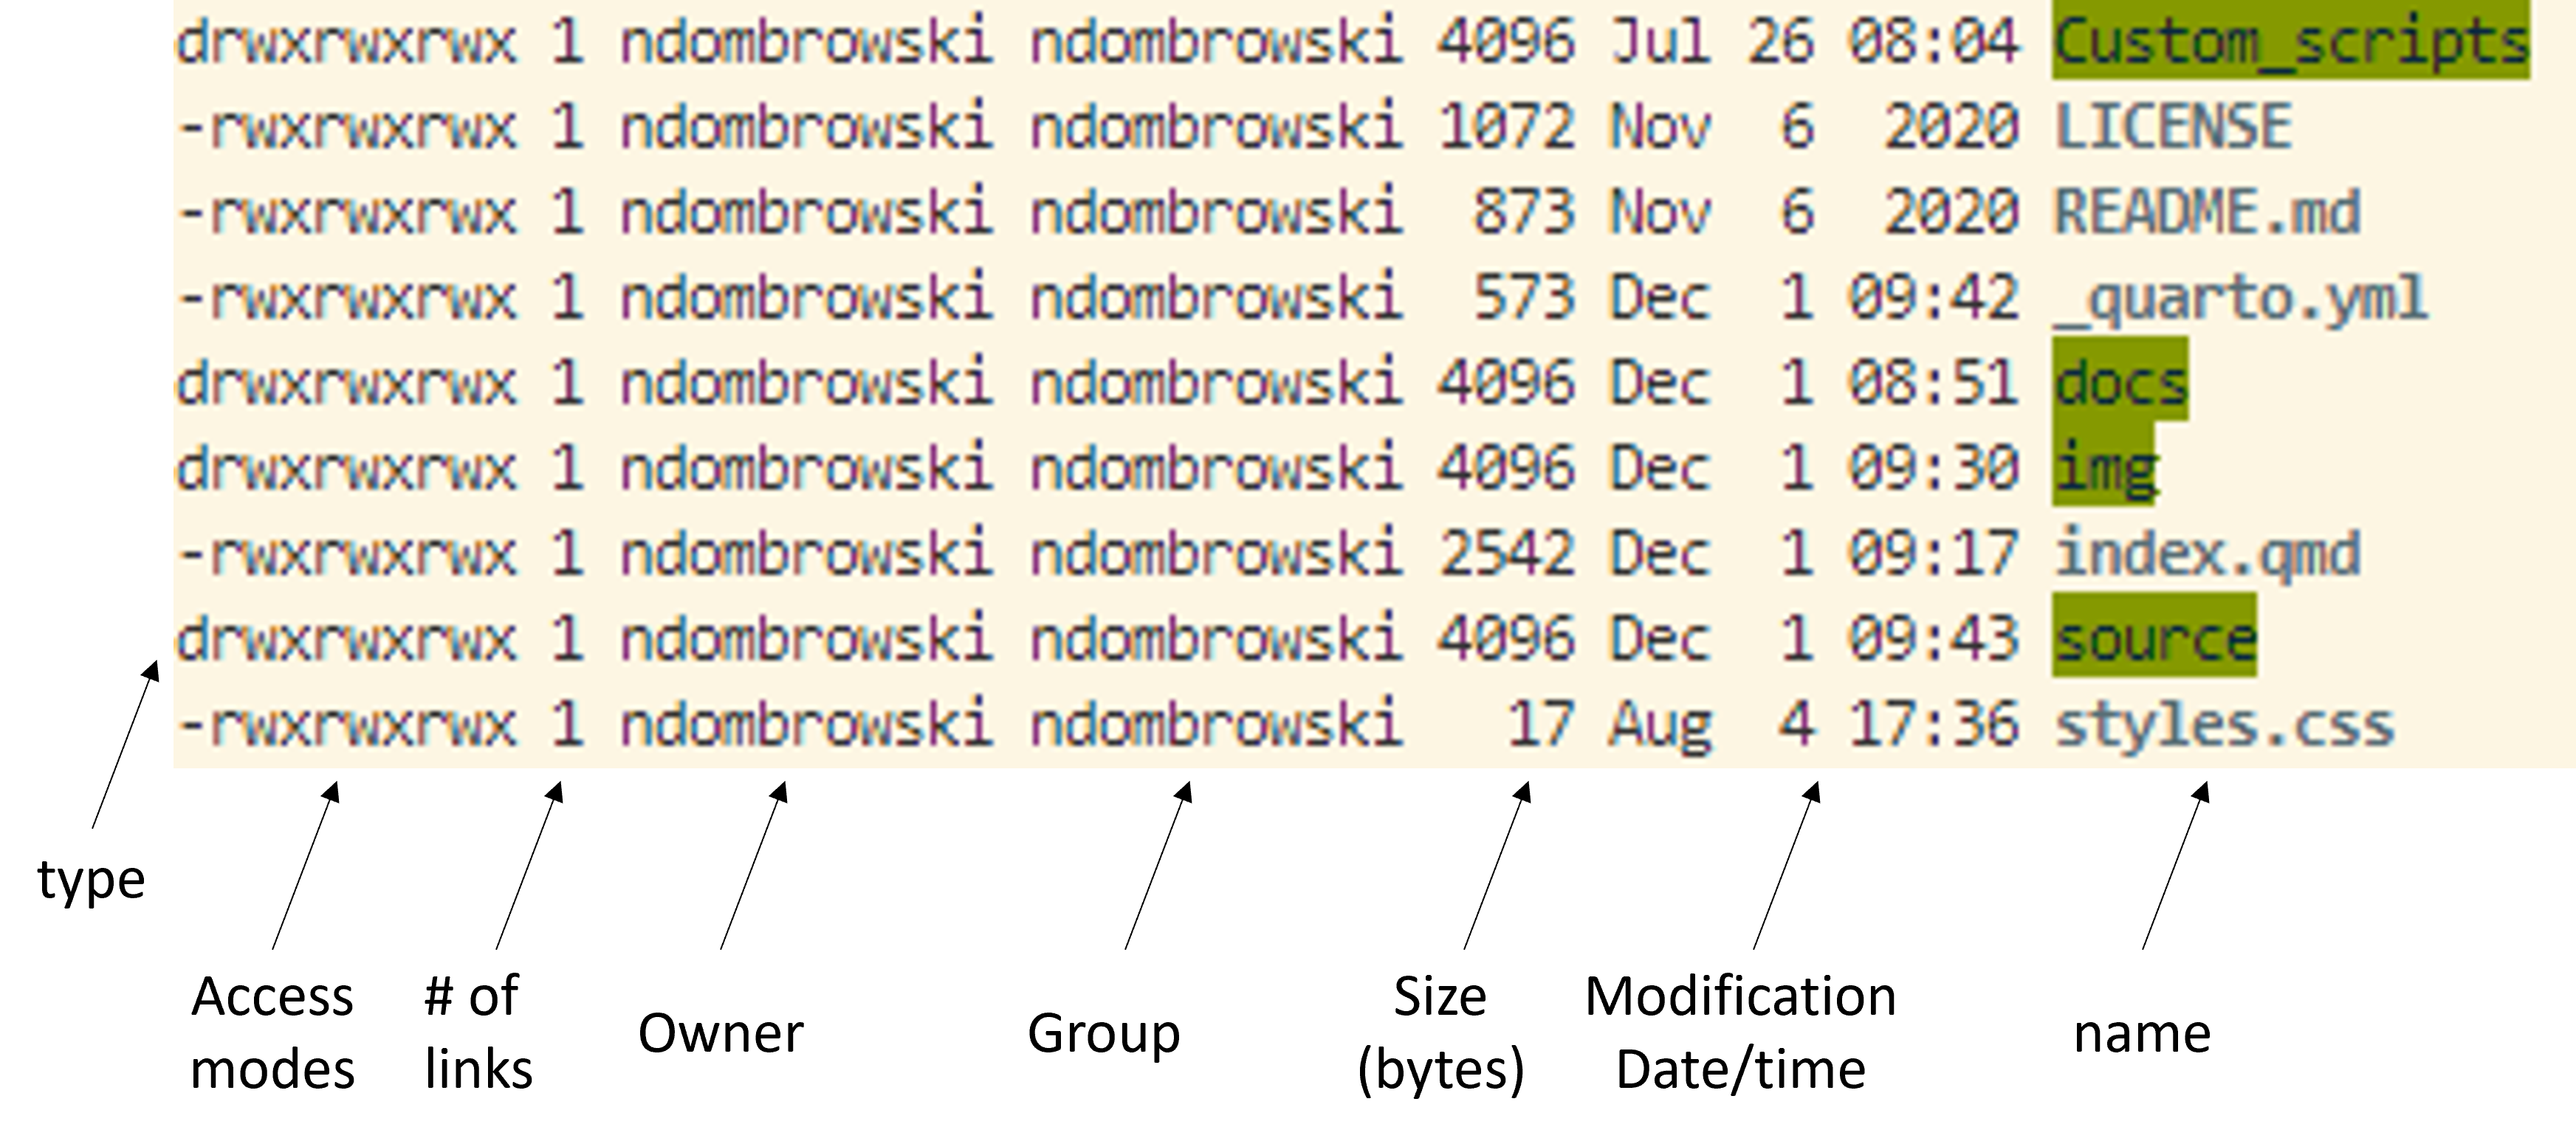
lsIn my case this returns something like this:

This might look a bit different for your system in terms of color and file/folder names but what we basically see are the files (in bold text) and folders (green-highlighted text).
General structure of a Unix command
Next, let’s go into how commands, like ls can be used a bit more precisely. Let´s start with looking at the general structure of a command:
command [options] [arguments]
- command is the name of the command you want to use, i.e.
lswould be an example for a very basic Unix command - arguments is one or more adjustments to the command’s behavior. I.e. for
lswe could use the following arguments- Short notation:
-a - Long notation:
—all
- Short notation:
Let’s explore more about how to use this arguments in the next section.
ls: Viewing the content of a folder
Let’s look a bit closer into the ls command and use it with an argument -l.
As a reminder:
lsstands for list directory contents- everything starting with a minus symbol is an optional argument we can use
-lis an additional argument we can use that makes ls use a long listing format
ls -lAfter running this, we should see our files and folders but in what is called the long format (which gives way more information):

If you are unsure what options come with a program its always a good idea to check out the manual. You can do this with:
man lsYou can exit the manual by pressing q.
In case you want to check what a program does or what options there are, depending on the program there might be different ways how to do this. These most common ways are:
man lsls --helpls -h
cd: Moving around folders
Next, lets move around these folders using the cd command, which let’s you change the directory. If you run this on your computer exchange source to a folder name that you see when using ls. If there are no directories, we will explain a bit later how to generate new directories.
cd source/If you use pwd afterwards, then you should see that we moved into another directory. We can also move back to our original directory as follows:
cd ..We can also move around multiple levels for example here i am going into the source folder, then back to the home directory and then into the docs folder.
cd source/../docsAnother useful way to move around quickly is using the tilde symbol, i.e. ~, that can be used as a shortcut to move directly into our home directory:
cd ~Pathnames
Next, let’s discuss an important distinction between absolute and relative pathnames.
Absolute pathnames
An absolute pathname begins with the root directory and follows the tree branch by branch until the path to the desired directory or file is completed. For example on your computer full path to our Desktop might be /Users/username/Desktop
If we want to go to the desktop using an absolute path we do the following:
cd /Users/username/DesktopRelative pathnames
A relative pathname starts from the directory you are currently in and you traverse to other directories relative from this directory. When using the relative pathway allows you to use a couple of special notations to represent relative positions in the file system tree.
.(dot) The working directory itself..(dot dot) Refers to the working directory’s parent directory
If we want to go to the source directory using an relative path we do the following (again change this to whatever folder you see when using ls):
cd Desktopmkdir: Making new folders
Now that we know how to explore our surroundings, let us make a new folder in which we can generate some new files later on. For this we use the mkdir command.
To do this, we will first move into our home directory and create a new folder from which we later run all further commands
#go into the folder from which you want to work (i.e. the home directory)
cd ~

#make a new folder (in the directory we currently are in, name it new_older)
mkdir playground

#check if new folder was generated
ls

#next we move into the newly generated folder
cd playground
Generating and viewing files
Ensure that you run the following steps while being in the playground folder you just generated.
Using nano
Now, let’s make some files of our own using nano. Nano is a basic text editor that lets us view and generate text.
#ensure that we work in the right folder
pwd

#open a new document and name it random.txt
nano random.txt
Once we type nano random.txt and press enter then a text document will open. In there:
- Type something into this document
- Close the document with
control + X - Type
yto save changes and press enter
If we now use ls -l again, we see that a new file was generated.
We can use nano to open whatever document we want, but for larger files it might take a long time to read everything into memory. For such cases, let’s look at some alternative text viewers.
Using less
less is a program that lets you view a file’s contents one screen at a time. This is useful when dealing with a large text file because it doesn’t load the entire file but accesses it page by page, resulting in fast loading speeds.
less random.txtOnce started, less will display the text file one page at a time.
- You can use the arrow Up and Page arrow keys to move through the text file
- To exit less, type
q
For files with a lots of columns or long strings we can use:
less -S random.txtIn this mode we can also use the arrow right and left keys, to view columns that are further on the right.
Using head
Another, very quick way to check the first 10 rows is head:
head random.txtUsing tail
If you want to check the last 10 rows use tail
tail random.txtI/O redirection to new files
By using some special notations we can redirect the output of many commands to files, devices, and even to the input of other commands.
Standard output (stdout)
By default, standard output directs its contents to the display, i.e. when we use ls the list of files and folders is printed to the screen. However, we can also redirect the standard output to a file by using > character is used like this:
#redirect the output from ls to a new file
ls -l > file_list.txt

#check what happened (feel free to also use the other methods we have discussed)
nano file_list.txt
If we would use ls -l > file_list.txt again we would overwrite the content of any existing files. However, there might be instances were we want to append something to an existing file. We can do this by using >>:
ls -l >> file_list.txt

#check what happened
nano file_list.txt
cp and mv: Copying and moving files
Next, let’s move the text file we generated before around. To do this, we mainly need two commands:
cp- copy files and directoriesmv- move or rename files and directories
#make a new folder
mkdir our_files

#copy our random file into our new folder
cp random.txt our_files
If we check the content of our working directory and the newly generated folder after doing this, we should see that random.txt exists now twice. Once in our working directory and once in the our_files folder. If we want to move a file, instead of copying, we can do the following:
#copy our random file into our new_folder
mv random.txt our_files
Now, random.txt should only exist once in the our_files folder.
rm: Removing files and folders
To remove files and folders, we use the rm command. Let’s first remove the text file we generated:
#rm a file
rm our_files/random.txt

#check if that worked
ls -l our_files
If we want to remove a folder, we need to tell rm that we want to remove folders using an argument. To do this, we use the -r argument (to remove directories and their contents recursively).
Unix does not have an undelete command.
Therefore, if you delete something with rm, it’s gone.
So use rm with care and check what you wrote twice before pressing enter!
#rm a directory
rm -r our_files

#check if that worked
ls -lwget: Downloading data
Next, let’s download some data to learn how to manipulate files. One way to do this is using the wget. With -P we specify were to download the data:
#make a folder for our downloads
mkdir downloads

#download a genome from ncbi using wget
wget -P downloads ftp://ftp.ncbi.nlm.nih.gov/genomes/all/GCA/002/728/275/GCA_002728275.1_ASM272827v1/GCA_002728275.1_ASM272827v1_genomic.fna.gzgzip: Compressing files
Compressing data using gzip
After downloading and exploring the content of the downloads folder, you see that the file we downloaded ends with gz. This indicates that we work with a gzip-compressed file. Gzip is a tool used to compress the size of files.
In order to work with files, we sometimes need to de-compress them first. We can do this as follows (by using the decompress, -d argument):
#decompress gz data (-d = decompress)
gzip -d downloads/GCA_002728275.1_ASM272827v1_genomic.fna.gz
Conversely, if you want to compress a file, you can do this as such:
#compress
gzip downloads/GCA_002728275.1_ASM272827v1_genomic.fnatar: Making a tarball
Another file compression you might encounter is tar:
- Short for Tape Archive, and sometimes referred to as tarball, is a file in the Consolidated Unix Archive format.
- The TAR file format is common in Unix and Unix-like systems when storing data (however, we do not compress our files when using the tar files)
- TAR files are often compressed after being created and then become TGZ files, using the tgz, tar.gz, or gz extension.
Let’s try to make a compressed tarball with the file we just downloaded.
#decompress gz data
gzip -d downloads/GCA_002728275.1_ASM272827v1_genomic.fna.gz

#create a tar file, to_compress.tar.gz, from our downloads directory
tar -cvzf to_compress.tar.gz downloads
If we print the content of our working directory with ls we now see an additional file, to_compress.tar.gz. We can uncompress this file into a new folder as follows:
#make a folder into with to compress the data
mkdir to_compress

#decompress
tar -xvf to_compress.tar.gz -C to_compress

#check what happened
ls to_compress
We can see that there is one folder in to_compress, our downloads folder.