conda config --add envs_dirs /zfs/omics/projects/bioinformatics/software/miniconda3/envs/pyGenomeTracks
Introduction
pyGenomeTracks aims to produce high-quality genome browser tracks that are highly customizable (Lopez-Delisle et al. 2020). Currently, it is possible to plot:
- bigwig
- bed/gtf (many options)
- bedgraph
- bedgraph matrices (like TAD-separation scores)
- epilogos
- narrow peaks
- links (represented as arcs, triangles or squares)
- Hi-C matrices (as triangle or squares)
- fasta
- maf (multiple alignment format)
For more examples, please visit the tools github or documentation.
Installation
Installed on Crunchomics: Yes,
- pyGenomeTracks v3.9 is installed as part of the bioinformatics share. If you have access to Crunchomics and have not yet access to the bioinformatics share, then you can send an email with your Uva netID to Nina Dombrowski, n.dombrowski@uva.nl.
- Afterwards, you can add the bioinformatics share as follows (if you have already done this in the past, you don’t need to run this command):
If you want to install it yourself, you can run:
mamba create --name pygenometracks_3.9 -c bioconda -c conda-forge pygenometracks=3.9

# Optional: Add tool to convert bam files into other formats
conda activate pygenometracks_3.9
mamba install -c conda-forge -c bioconda deeptools

conda deactivate
Usage
Optional: Convert bam files
pyGenomeTracks can work with bam files but for some applications it can be useful to generate other output formats, for example if we wanted to depict coverage information separately for each strand.
To convert bam to bedgraph format with one file for each strand you can use bamCoverage from the deepTools software:
bamCoverage --bam sample1.bam \
    --outFileFormat bedgraph \
    -o sample1.bam_forward.bedgraph \
    --filterRNAstrand forward

bamCoverage --bam sample1.bam \
    --outFileFormat bedgraph \
    -o sample1.bam_reverse.bedgraph \
    --filterRNAstrand reverse
Generated output:
Bedgraph files give coordinate information (chr, start and end) as well as a numerical 4th column coverage information. The coverage is calculated as the number of reads per bin, where bins are short consecutive counting windows of a defined size. It is possible to extended the length of the reads to better reflect the actual fragment length. bamCoverage offers normalization by scaling factor, Reads Per Kilobase per Million mapped reads (RPKM), counts per million (CPM), bins per million mapped reads (BPM) and 1x depth (reads per genome coverage, RPGC).
By default the output is not normalized, if this is desired, visit the bamCoverage manual for more information.
Generate a configuration file
To run pyGenomeTracks a configuration file describing the tracks is required. The easiest way to create this file is using the program make_tracks_file which creates a configuration file with defaults that can be easily changed. The format is:
make_tracks_file --trackFiles <file1.bedgraph> <file2.bedgraph> ... -o tracks.iniIf you have several files, you can also provide them as a list:
# Create a list with first all forward followed by all reverse files
ls *forward.bedgraph  > img/tracks_bg
ls *reverse.bedgraph  >> img/tracks_bg

# Generate a configuration file also including two genome annotation files as gtf (if we for example want to compare results from 2 assembly approaches)
make_tracks_file --trackFiles $(cat img/tracks_bg ) \
    assembly1.gtf \
    assembly2.gtf  \
    -o img/tracks.ini

# Optional: Modify the configuration file
# This can be done by manually opening the file or editing via sed
# Example: Set labels = false to labels true and define where labels are depicted
sed -i "s/labels = false/labels = true/g" img/tracks.ini
sed -i "s/#all_labels_inside = true/all_labels_inside = true/g" img/tracks.ini
sed -i "s/#labels_in_margin = true/labels_in_margin = true/g" img/tracks.ini

# You can also add spacers to better separate different tracks, for example:
sed -i '/\[assembly1\]/i \
[spacer]\nheight = 0.5\n' img/tracks.ini

sed -i '/\[assembly2\]/i \
[spacer]\nheight = 0.5\n' img/tracks.ini
Generate an image
With the configuration file, a region can be plotted using:
pyGenomeTracks --tracks img/tracks.ini --region chr2:10,000,000-11,000,000 --outFileName nice_image.pdfYou can also automate the plotting. For example, if we are interested in certain genes that are listed in the 9th column of the gtf file we can use some bash scripting to automatically extract the coordinates. Below is an example but this might need adjustment depending on the exact structure of your gtf files.
# Define gene we care about, keep the \" for exact matches
to_find="MSTRG.1125\""
# Search the gtf file for the gene of interest and confirm that the right information is printed
awk -F "\t" -v gene="$to_find" '$9 ~ gene' assembly1.gtf
# If the above is correct, store the gene ID in a variable
gene_id=$(awk -F "\t" -v gene="$to_find" '$9 ~ gene' assembly1.gtf | \
cut -f9 | cut -f2 -d " " | sort -u)
# Use the geneID to automatically label or output image
file_name=$(echo $gene_id | sed 's/"//g;s/;//g')
# Extract the coordinates and add some space to the left and right
coordinates=$(grep ${gene_id} assembly1.gtf | \
awk '$3 == "transcript" {if (min == "" || $4 < min) min = $4; if (max == "" || $5 > max) max = $5} \
END {printf "%s:%\047d-%\047d", $1, min-500, max+500, min, max}')
# Confirm that the right coordinates were extracted
echo $coordinates
# Generate an image
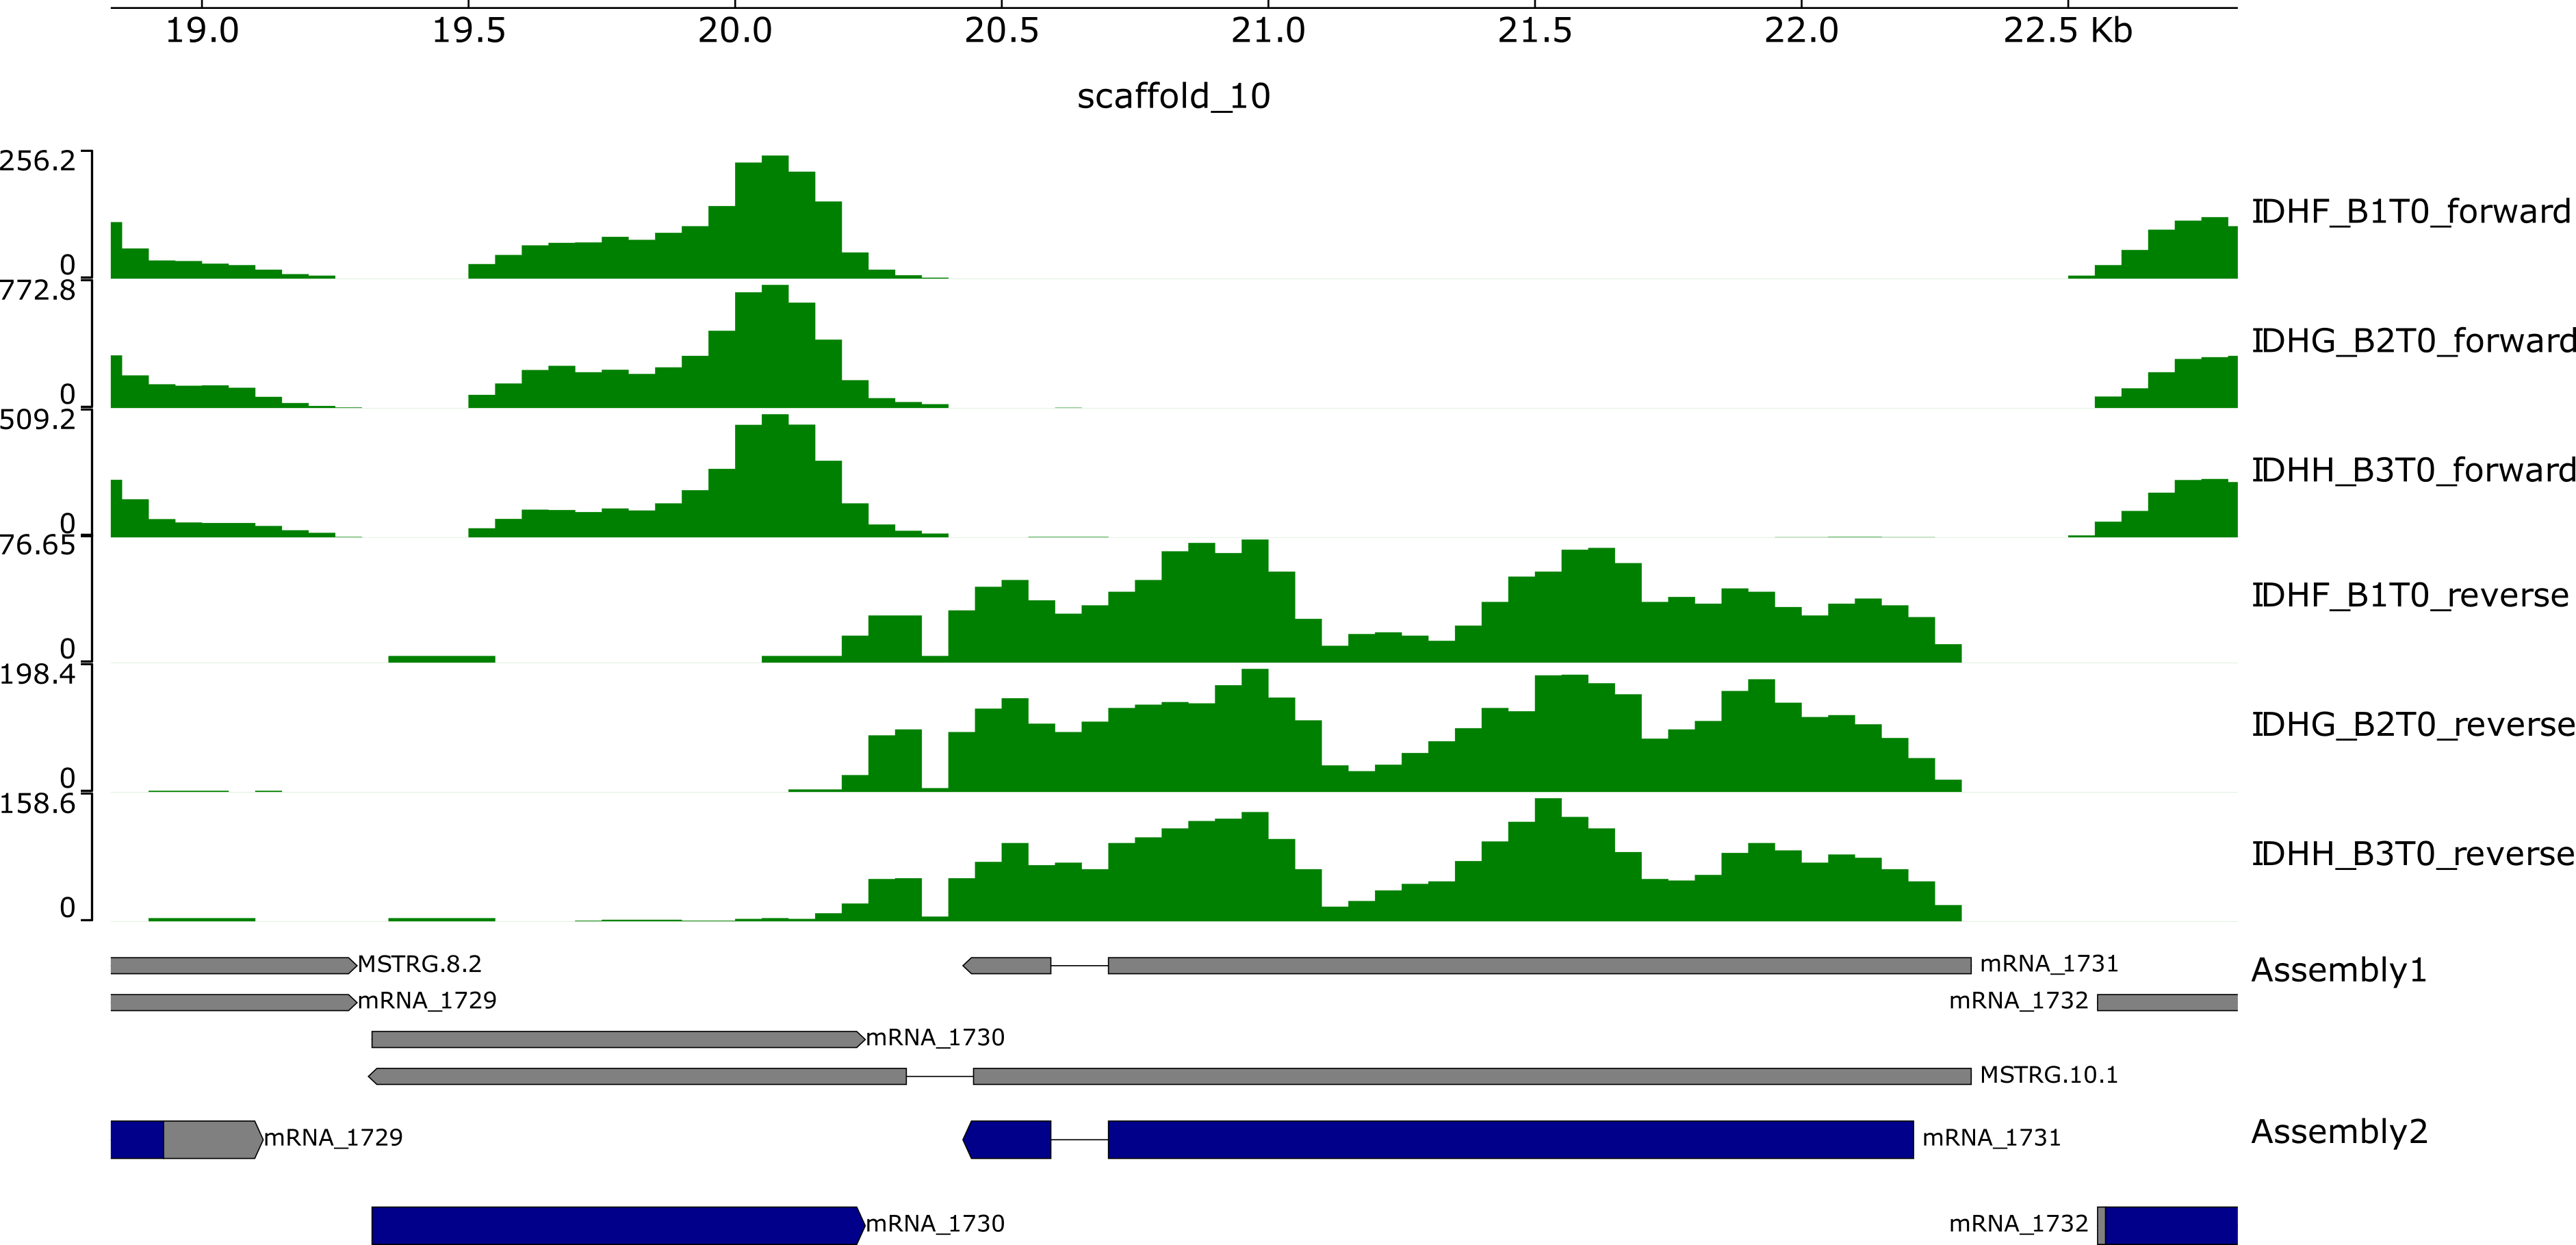
pyGenomeTracks --tracks img/tracks.ini --region $coordinates --outFileName img/${file_name}.pdfExample output:
Description of other possible arguments:
options:
  -h, --help            show this help message and exit
  --tracks TRACKS       File containing the instructions to plot the tracks.
                        The tracks.ini file can be genarated using the
                        `make_tracks_file` program.
  --region REGION       Region to plot, the format is chr:start-end
  --BED BED             Instead of a region, a file containing the regions to
                        plot, in BED format, can be given. If this is the
                        case, multiple files will be created. It will use the
                        value of --outFileName as a template and put the
                        coordinates between the file name and the extension.
  --width WIDTH         figure width in centimeters (default is 40)
  --plotWidth PLOTWIDTH
                        width in centimeters of the plotting (central) part
  --height HEIGHT       Figure height in centimeters. If not given, the figure
                        height is computed based on the heights of the tracks.
                        If given, the track height are proportionally scaled
                        to match the desired figure height.
  --title TITLE, -t TITLE
                        Plot title
  --outFileName OUTFILENAME, -out OUTFILENAME
                        File name to save the image, file prefix in case
                        multiple images are stored
  --fontSize FONTSIZE   Font size for the labels of the plot (default is 0.3 *
                        figure width)
  --dpi DPI             Resolution for the image in case the ouput is a raster
                        graphics image (e.g png, jpg) (default is 72)
  --trackLabelFraction TRACKLABELFRACTION
                        By default the space dedicated to the track labels is
                        0.05 of the plot width. This fraction can be changed
                        with this parameter if needed.
  --trackLabelHAlign {left,right,center}
                        By default, the horizontal alignment of the track
                        labels is left. This alignemnt can be changed to right
                        or center.
  --decreasingXAxis     By default, the x-axis is increasing. Use this option
                        if you want to see all tracks with a decreasing
                        x-axis.
  --version             show program's version number and exit
References
Lopez-Delisle, Lucille, Leily Rabbani, Joachim Wolff, Vivek Bhardwaj, Rolf Backofen, Björn Grüning, Fidel Ramírez, and Thomas Manke. 2020. “pyGenomeTracks: Reproducible Plots for Multivariate Genomic Datasets.” Edited by Robinson Peter. Bioinformatics 37 (3): 422–23. https://doi.org/10.1093/bioinformatics/btaa692.