Code documentation
Basics
Documenting your code is crucial for both your future self and anyone else who might work with your code. Documentation serves as a roadmap for your code. It helps others (and your future self) understand the purpose, functionality, and usage of your code.
A Guide to Reproducible Code in Ecology and Evolution gives detailed information on how to organize project folders and how to write clear and reproducible code. The examples are mainly based on R code but most are general enough to apply to other computational langauges (and scientific disciplines).
This website gives some exellent guidelines on how to setup a good folder structure and introduces you to standards when naming folders and files.
Choose Your Editor
Plain text editor
When documenting code, its best to avoid visual editors, such as word, as they are not designed for writing code.
Instead you can use a plain text editor, such as TextEdit (Mac) or Notepad (Windows). This is the easiest to get started but you will loose some functionality, such as using headers or writing text in bold.
Alternatives, that offer more functionality, are for example RStudio or VScode.
Rmarkdown in RStudio
RMarkdown is an extension of Markdown that allows you to integrate R code directly into your documentation.
If you have not install R and Rstudio, follow these instructions.
In RStudio you can create an R Markdown File by:
- In RStudio, go to File -> New File -> R Markdown
- Choose a title, author, and output format
- Knit the Document:
- Click the “Knit” button to render your R Markdown document into the chosen output format.
For more information visit the RMarkdown tutorial.
Quarto in Rstudio
Quarto is an alternative to RMarkdown for creating dynamic documents in RStudio but can be read by other editors, such as VScode. Compared to RMarkdown it provides enhanced features for document creation and includes many more built in output formats (and many more options for customizing each format).
It is installed by default on newer R installations.
- In RStudio, go to File -> New File -> Quarto document
- Choose a title, author, and output format
- Render the Document:
- Click the “Render” button to render your R Markdown document into the chosen output format.
For more information (and more functionality) visit the Quarto website.
VSCode
Visual Studio Code (VSCode) is a versatile and user-friendly code editor. It provides excellent support for various programming languages, extensions, and a built-in terminal but might take a bit of work to setup to work with different compuational languages.
- Installation:
- Download and install VSCode from here.
- Extensions:
- Install extensions relevant to your programming language (e.g., Python, R). These extensions enhance code highlighting and provide additional features.
Markdown for Documentation
Markdown is a lightweight markup language that’s easy to read and write. It allows you to add formatting elements to plain text documents.
Headers:
Use # for headers. The more # symbols, the smaller the header. When writing a header make sure to always put a space between the # and the header name.
# Main Header
## Subheader
Lists:
Use - or * for unordered lists and numbers for ordered lists.
Ordered lists are created by using numbers followed by periods. The numbers don’t have to be in numerical order, but the list should start with the number one.
1. First item
2. Second item
3. Third item
4. Fourth item
1. First item
2. Second item
3. Third item
1. Indented item
2. Indented item
4. Fourth item Unordered lists are created using dashes (-), asterisks (*), or plus signs (+) in front of line items. Indent one or more items to create a nested list.
- First item
- Second item
- Third item
- Fourth item
- First item
- Second item
- Third item
- Indented item
- Indented item
- Fourth item You can also combine ordered with unordered lists:
1. First item
2. Second item
3. Third item
    - Indented item
    - Indented item
4. Fourth item
Code Blocks:
Enclose code snippets in triple backticks.
```bash
grep "control" downloads/Experiment1.txt
```
Links:
Create links to external resources or within your documentation.
[Link Text](https://www.example.com)Emphasis:
Use * or _ for italic and ** or __ for bold.
*italic*
**bold**
Pictures
You can easily add images to your documentation as well:
Here, replace Alt Text with a descriptive alternative text for your image, and path/to/your/image.jpg with the actual path or URL of your image.
Tables
Tables can be useful for organizing information. Here’s a simple table:
| Header 1 | Header 2 |
| ---------| ---------|
| Content 1| Content 2|
| Content 3| Content 4|
An example notebook
If you want to see an example for documented code, check out an example of a notebook in which I started working with some sequencing data.
The link above leads you to an example for:
- How could I use github to make my code available to others
- How could a “code book” look like? The example you see in the folder is provided a Quarto markdown file here and for convenience the report was also rendered as a html to make it easier to read for potential collaborators. To view the HTML report, you need to download it first.
Please note that this is just an example to get you started and such a report might look different depending on your needs.
Below you find some snippets from the report rendered to HTML and some thoughts for what to put into different sections.
YAML header

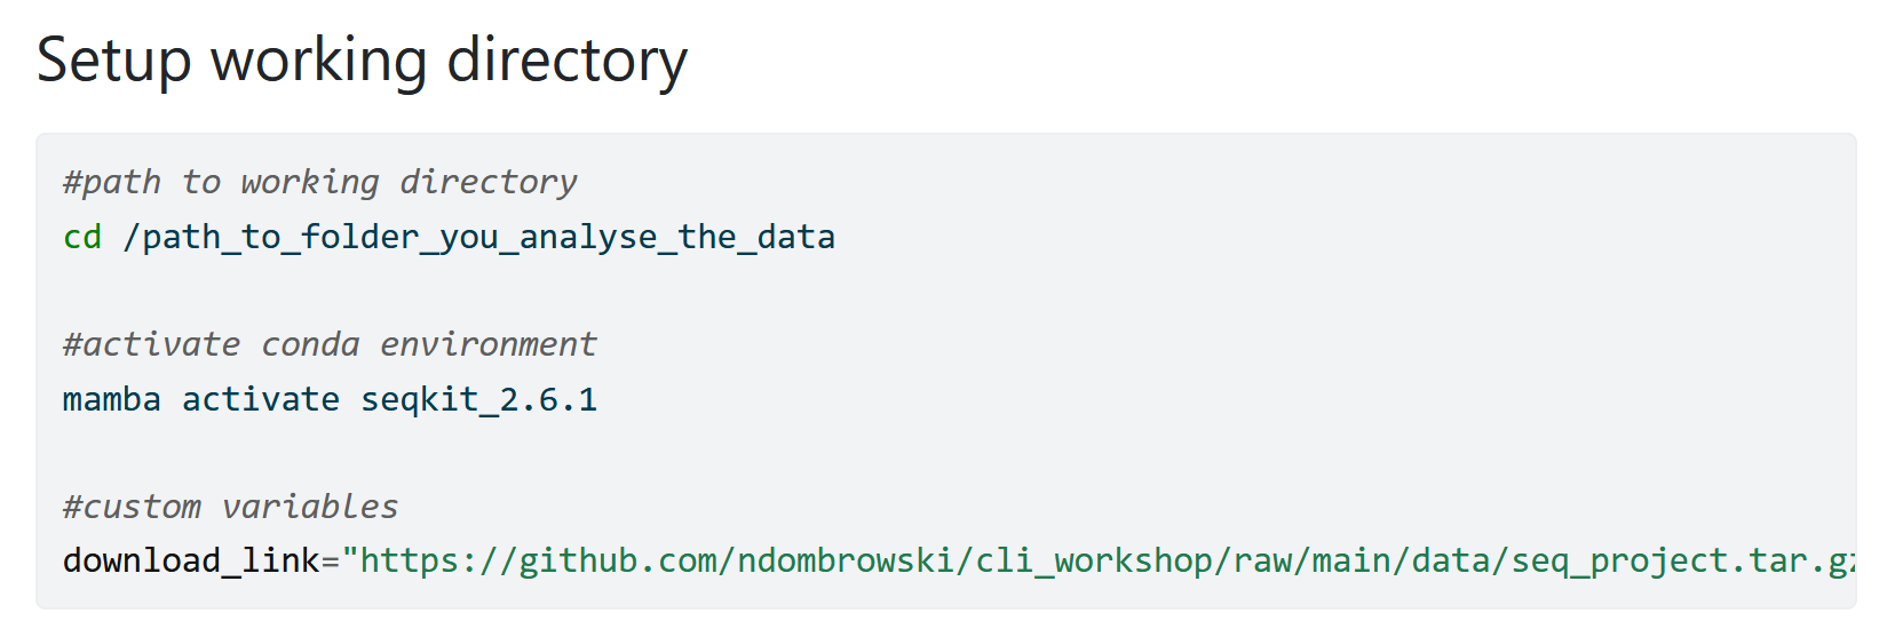
Setting up your working directory

In this first section I add everything that a user that wants to use my workflow has to change and I try to standardize the code below, so that another user could just run this as is without having to edit anything. Typically things to add are:
- From where to start the analyses
- Custom paths, to for example for databases that need to be downloaded from elsewhere
- Custom variables: In the example above I store the link to the data in a variable called
download_link, I then use the variable in the code below to download the data. By doing it this way I have one location in the code another person needs to change the code when for example the path to the data changes. The code below stays the same. When writing code try to think ahead and minimize the number of instances where things need to be changed if for example the location to your data changes. - …
I tend to NOT add the information how I use scp to log into an HPC to keep my user name and login information private.
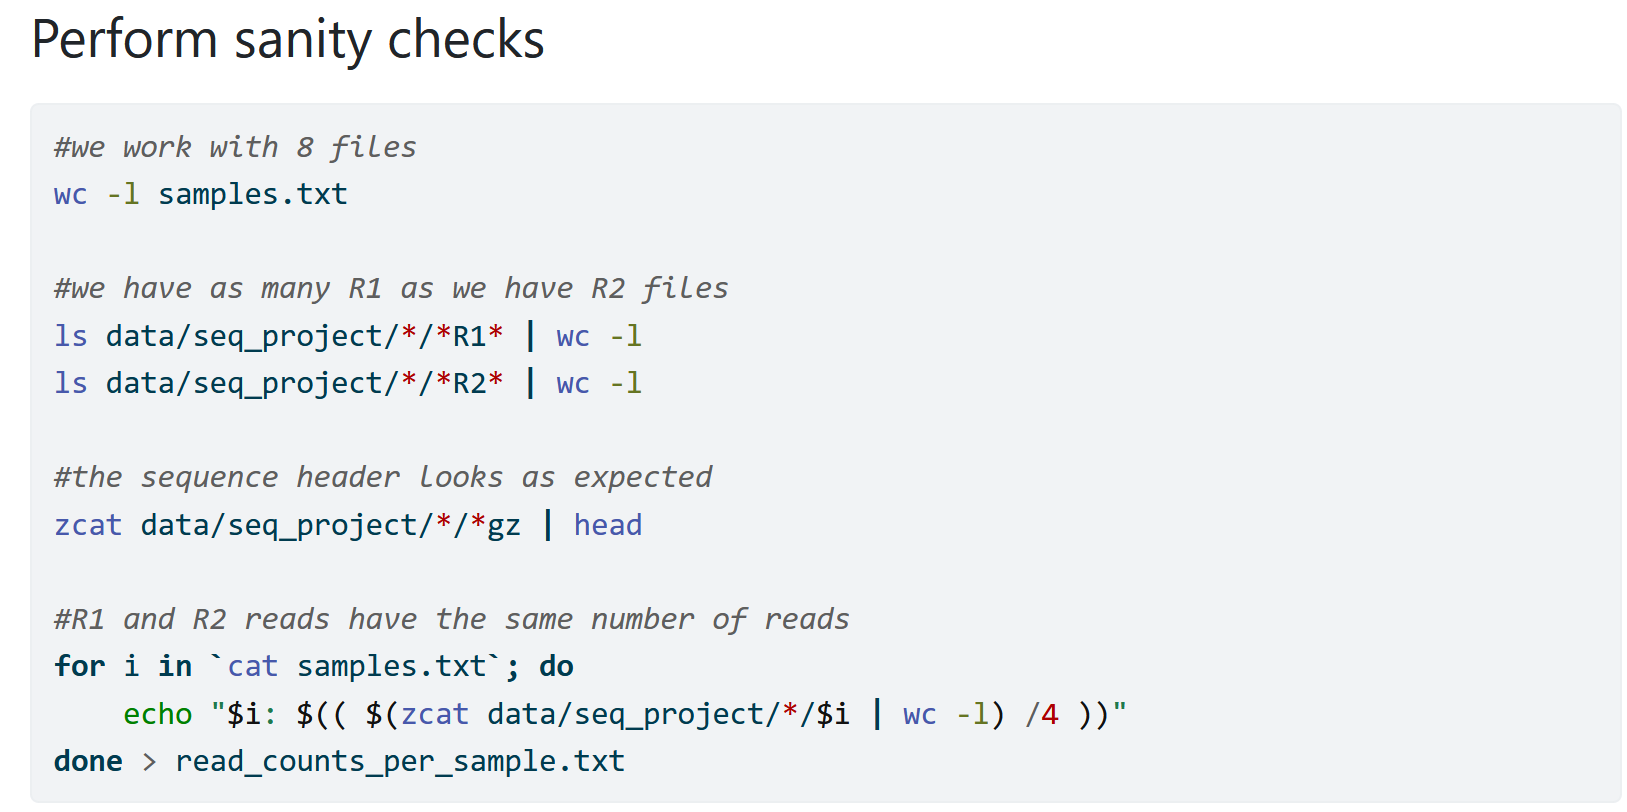
Sanity checks

When I first start working with new data, I try to add as many sanity checks as possible to ensure that my data looks good. That way I avoid that I don’t notice an issue and run into trouble further down the line. I at the same time understand my data more and learn with how many samples and how much data I am working with.
I also add such sanity checks whenever I modify my data. For example, when I merge individual files into a large file I might count the lines for the individual files and the combined file simply to ensure that I used my wildcards correctly.
Remember: The computer is only as smart as the person using it and will blindly run your commands. Because of that the computer can do unexpected things and you need to account for that.
Using markdown to make notes

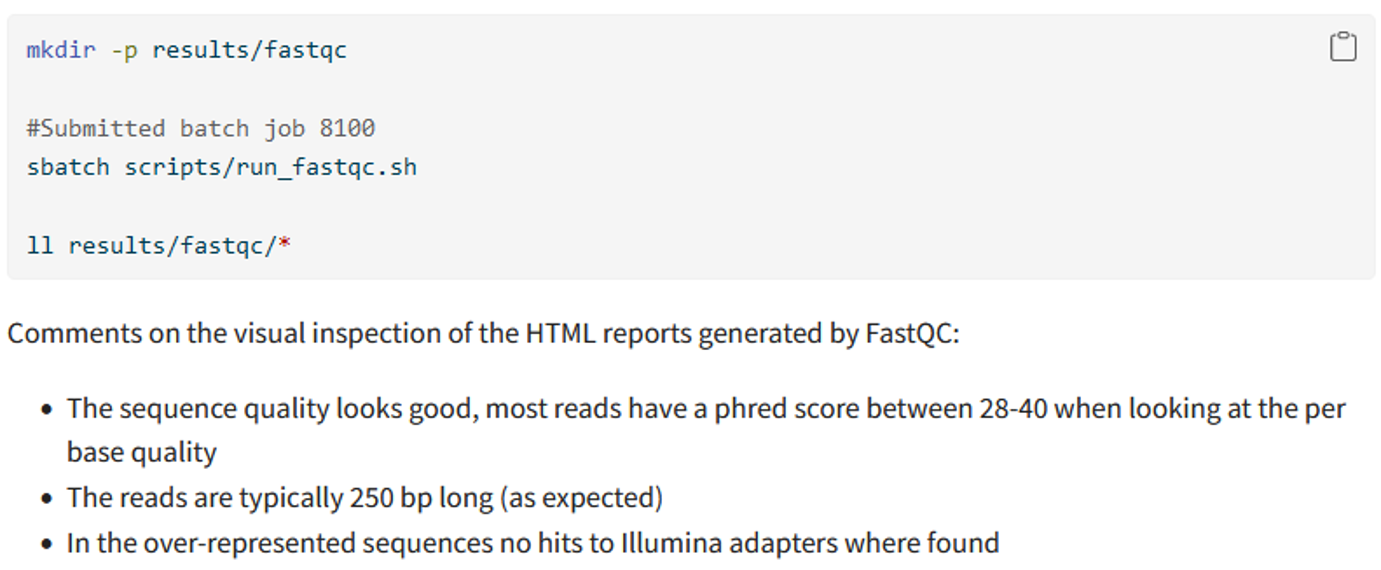
In the example above I use markdown to not only document my code but also add some comments whenever I might need it. For example here, I added some notes about what the results from FastQC actually told me.
This kind of documentation can be useful for:
Justifying decisions further down the line. In this example, I might decide on how to clean the sequencing data. For example, if I would have found a lot of low quality reads or the adapter still being part of the sequence then I would have specifically cleaned my sequences to deal with that
Future you. If you read the report a month, or a year, later you have the key information in your report and don’t have to view the actual data or redo summary steps.
Documenting external scripts

This part might make more sense after you have worked through the part of the tutorial about using an HPC. But what you see here is how I have written down code that simply says that I submitted a script to an HPC but it does not actually say how I ran the FastQC software. The actual code is “hidden” inside of the run_fastqc.sh script. This also means that a person reading your workflow does not have the code right away. You can deal with this in two ways.
- Instead of the sbatch command, you can add the actual line of code that was run on the compute node.
- When publishing your code with your manuscript, add the whole scripts folder to where you publish the main code, i.e. on github or zenodo
I tend to prefer number 2 because I like to record the code in my notebooks exactly as I ran them but you can do it differently as long as all the code you ran is recorded and accessible to others once you publish your data.